When I first step into a small bathroom, I can immediately tell whether the space will feel airy or cramped just by looking at the tiles. Tile size, more than colour or pattern alone, sets the tone for the entire room. Over the years, working on UK bathrooms from tiny city flats to suburban en-suites, I’ve seen how the right—or wrong—tile can make a small bathroom feel either expansive or suffocating.
I remember a project in a 1.8m x 2.2m London bathroom. The previous owner had used tiny mosaics on every surface. The grout lines were everywhere, the room felt cluttered, and cleaning was a nightmare. We replaced most of the walls with large 60x120cm porcelain tiles, laid vertically. Suddenly, the bathroom felt taller, cleaner, and more modern, even though nothing else changed structurally. That’s the power of tile size in a small bathroom.
Why Tile Size Really Matters
In small bathrooms, the wrong tile size can shrink the space visually or make it feel overly busy. Small tiles, while charming in certain contexts, create multiple grout lines that break up the visual continuity. This can make even a modestly sized bathroom feel tighter. On the other hand, very large tiles in tiny, awkward spaces can lead to tricky cuts around fixtures or walls, which may look sloppy if not installed carefully.
Tile size also affects practical matters like cleaning, maintenance, and slip-resistance. Fewer grout lines mean less scrubbing, while smaller tiles can provide better grip in wet areas. Balancing these factors is key to creating a space that’s both beautiful and functional.
Choosing the Right Tile Size
From my experience on UK projects, a few rules of thumb usually guide homeowners to a successful layout:
-
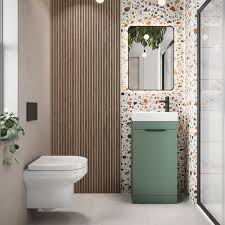
Walls: Large format tiles—like 60x120cm or 60x60cm—work exceptionally well. They create a smooth, continuous surface that visually enlarges the room. Lighter, neutral colours combined with a glossy or semi-gloss finish reflect light, helping the space feel open and airy. In very narrow bathrooms, vertical placement can emphasise height, while horizontal stacking can make a room feel wider.
-
Floors: Large tiles are fine if they are slip-resistant, but smaller tiles—10x10cm mosaics, for instance—can be useful in wet zones like showers because the extra grout provides grip. On floors, I tend to balance safety with the visual effect: larger tiles for the main floor and smaller mosaics in niche areas.
-
Accents: Small tiles or mosaics are excellent for splashbacks, shower niches, or decorative borders. They add personality without overwhelming the room if used sparingly. One client wanted a subtle feature behind their basin. Using 15x15cm tiles for just that area added texture without shrinking the space.
Layout and Orientation Tips
Tile size is just one piece of the puzzle. How you lay tiles can dramatically affect perception:
-
Vertical wall tiles: Create the illusion of height in bathrooms with lower ceilings.
-
Horizontal wall tiles: Make narrow bathrooms feel wider.
-
Diagonal floor tiles: Break up the floor visually, adding depth and dimension.
I often encourage homeowners to imagine stepping into their bathroom. The eye naturally follows lines and edges. Fewer grout interruptions create a sense of continuity, so simple layouts with minimal cuts usually look best. In a small en-suite I recently renovated, we used large-format tiles on all walls and a medium-sized, slip-resistant floor tile. The room instantly felt more spacious and welcoming, and it required much less maintenance than the previous setup.
Colour and Finish Considerations
Tile size interacts strongly with colour and finish. Large, dark tiles can overwhelm a tiny bathroom, while lighter tones expand the space visually. Glossy finishes reflect light from windows or mirrors, brightening corners, while matte finishes reduce slip risks on floors. Subtle textures or veining add interest without cluttering the room visually.
Avoid overly busy patterns on walls or floors in compact spaces—they tend to shrink the visual perception of the room. Instead, focus on continuity, using pattern or texture in moderation, such as a feature strip or shower niche.
Practical Advice from Real UK Projects
When I consult homeowners, I always stress the importance of careful planning. Measure your bathroom thoroughly, consider where fixtures like toilets, basins, and showers sit, and visualise how tiles will meet edges and corners.
In one small Surrey bathroom, the homeowner wanted both style and low maintenance. We chose 60x120cm wall tiles and 60x60cm floor tiles, keeping grout lines to a minimum. The effect was immediate: the space felt modern, uncluttered, and much easier to clean. Even friends visiting remarked on how spacious it felt.
Another key consideration is budget. Large-format tiles may cost more per tile but can reduce labour time because fewer cuts are needed. Small mosaics, while often cheaper per piece, take longer to install and increase maintenance demands.
Bringing It All Together
In small bathrooms, bigger often is better—but the key is balance. Large-format wall tiles create a sense of openness, while carefully selected floor tiles provide safety and practicality. Accent tiles, mosaics, or feature areas can add style without overwhelming the room. Planning your layout, considering finishes, and imagining the eye’s movement through the space ensures the bathroom feels larger, brighter, and more functional.
From my hands-on experience, even the tiniest UK bathrooms can feel welcoming and luxurious with the right tile choices. Focus on continuity, simplicity, and proportion, and the result will be a small bathroom that feels bigger than it really is.
Recommended Strategy for Small Bathrooms:
-
Walls: 60x120cm or 30x60cm tiles, light and glossy.
-
Floors: 60x60cm or smaller slip-resistant tiles in wet zones.
-
Accents: Small mosaics only for shower niches or splashbacks.
-
Layout: Keep lines consistent, minimal grout, vertical or horizontal stacking based on height and width.